Web Scraping 101: Pulling Stories from Hacker News

This is a guest post by Hartley Brody, whose book “The Ultimate Guide to Web Scraping” goes into much more detail on web scraping best practices. You can follow him on Twitter, it’ll make his day! Thanks for contributing Hartley!

Hacker News is a treasure trove of information on the hacker zeitgeist. There are all sorts of cool things you could do with the information once you pull it, but first you need to scrape a copy for yourself.

Hacker News is actually a bit tricky to scrape since the site’s markup isn’t all that semantic — meaning the HTML elements and attributes don’t do a great job of explaining the content they contain. Everything on the HN homepage is in two tables, and there aren’t that many classes or ids to help us hone in on the particular HTML elements that hold stories. Instead, we’ll have to rely more on patterns and counting on elements as we go.

Pull up the web inspector in Chrome and try zooming up and down the DOM tree. You’ll see that the markup is pretty basic. There’s an outer table that’s basically just used to keep things centered (85% of the screen width) and then an inner table that holds the stories.

Debugging Hacker News Page

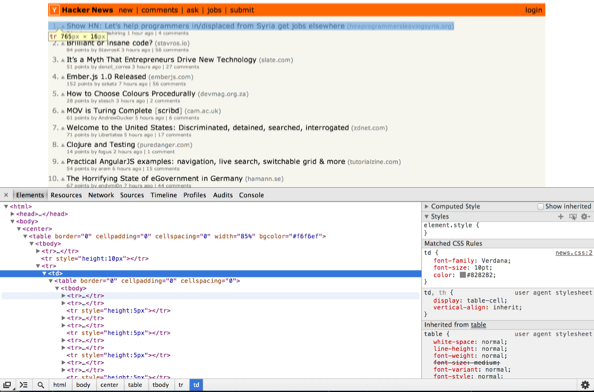
If you look inside the inner table, you’ll see that the rows come in groups of three: the first row in each group contains the headlines and story links, the second row contains the metadata about each story — like who posted it and how many points it has — and the third row is empty and adds a bit of padding between stories. This should be enough information for us to get started, so let’s dive into the code.

I’m going to try and avoid the religious tech wars and just say that I’m using Python and my trusty standby libraries — requests and BeautifulSoup — although there are many other great options out there. Feel free to use your HTTP requests library and HTML parsing library of choice.

In its purest form, web scraping is two simple steps: 1. Make a request to a website that generates HTML, and 2. Pull the content you want out of the HTML that’s returned.

As the programmer, all you need to do is a bit of pattern recognition to find the URLs to request and the DOM elements to parse, and then you can let your libraries do the heavy lifting. Our code will just glue the two functions together to pull out just what we need.

import requests

from BeautifulSoup import BeautifulSoup
# make a single request to the homepage
r = requests.get("https://news.ycombinator.com/")
# convert the plaintext HTML markup into a DOM-like structure that we can search
soup = BeautifulSoup(r.text)
# parse through the outer and inner tables, then find the rows
outer_table = soup.find("table")
inner_table = outer_table.findAll("table")[1]
rows = inner_table.findAll("tr")
stories = []
# create an empty list for holding stories
rows_per_story = 3
# helps us iterate over the table
for row_num in range(0, len(rows)-rows_per_story, rows_per_story):
	# grab the 1st & 2nd rows and create an array of their cells
	story_pieces = rows[row_num].findAll("td")
	meta_pieces = rows[row_num + 1].findAll("td")
	# create our story dictionary
	story = { "current_position": story_pieces[0].string, "link": story_pieces[2].find("a")["href"], "title": story_pieces[2].find("a").string, }
	try:
		story["posted_by"] = meta_pieces[1].findAll("a")[0].string
	except IndexError:
		continue # this is a job posting, not a story stories.append(story)

import json
print json.dumps(stories, indent=1)

You’ll notice that inside the for loop, when we’re iterating over the rows in the table two at a time, we’re parsing out the individual pieces of content (link, title, etc) by skipping to a particular number in the list of <td> elements returned. Generally, you want to avoid using magic numbers in your code, but without more semantic markup, this is what we’re left to work with.

This obviously makes the scraping code brittle, if the site is ever redesigned or the elements on the page move around at all, this code will no longer work as designed. But I’m guessing from the consistently minimalistic, retro look that HN isn’t getting a facelift any time soon. ;)

Extension Ideas

Running this script top-to-bottom will print out a list of all the current stories on HN. But if you really want to do something interesting, you’ll probably want to grab snapshots of the homepage and the newest page fairly regularly. Maybe even every minute.

There are a number of cool projects that have already built cool extensions and visualizations from (I presume) scraping data from Hacker News, such as:

  • http://hnrankings.info/
  • http://api.ihackernews.com/
  • https://www.hnsearch.com/

It’d be a good idea to set this up using crontab on your web server. Run crontab -e to pull up a vim editor and edit your machine’s cron jobs, and add a line that looks like this:

* * * * * python /path/to/hn_scraper.py

Then save it and exit (<esc> + “:wq”) and you should be good to go. Obviously, printing things to the command line doesn’t do you much good from a cron job, so you’ll probably want to change the script to write each snapshot of stories into your database of choice for later retrieval.

Basic Web Scraping Etiquette

If you’re going to be scraping any site regularly, it’s important to be a good web scraping citizen so that your script doesn’t ruin the experience for the rest of us… aw who are we kidding, you’ll definitely get blocked before your script causes any noticeable site degradation for other users on Hacker News. But still, it’s good to keep these things in mind whenever you’re making frequent scrapes on the same site.

Your HTTP Requests library probably lets you set headers like User Agent and Accept-Encoding. You should set your user agent to something that identifies you and provides some contact information in case any site admins want to get in touch.

You also want to ensure you’re asking for the gzipped version of the site, so that you’re not hogging bandwidth with uncompressed page requests. Use the Accept-Encoding request header to tell the server your client can accept gzipped responses. The Python requests library automagically unzips those gzipped responses for you.

You might want to modify line 4 above to look more like this:

headers = { "User-Agent": "HN Scraper / Contact me: ", "Accept-Encoding": "gzip", }
r = requests.get("https://news.ycombinator.com/", headers=headers)

Note that if you were doing the scraping with some sort of headless browser or something like Selenium which actually downloads all the resources on the page and renders them, you’d also want to make sure you’re caching the stylesheet and images to avoid unnecessary extra requests.

If you liked this article, you might also like:

  1. Scraping Web Sites which Dynamically Load Data
  2. Ideas and Execution Magic Chart (includes a Hacker News Search Hack)
  3. Running Your Own Anonymous Rotating Proxies

Adding Acknowledgement Semantics to a Persistent Queue

Persistence capability is not enough to ensure the reliability of message oriented middleware. Suppose that you retrieve an item from a queue, and the application or thread crashes in the middle of the process. The item and processes depending on it will be lost, since the crash occurred after retrieving the item from the queue. Acknowledgement semantics can prevent this loss If the application crashes before acknowledging an item. This item will continue to be available to other consumers until an acknowledgment is sent.

This Python code shows how to add acknowledgement to a class derived from the Python Queue class. In the article Persisting Native Python Queues we only show how to persist a queue. It is important to note that we have modified the base Python Queue class, adding the “connect” and “ack” methods. Each application thread must call the “connect” method before using the queue object. The “connect” method returns a unique queue proxy. If the thread crashes, the items that have been fetched, but not acknowledged, in this queue are enqueued again. The “ack” method uses the item returned by the “get” method and effectively removes the item from the queue. In this code ZODB is used for persistence instead of DyBASE. If the entire application crashes, not just a single thread, unacknowledged items are requeued when it restarts.

While acknowledgement semantics increases reliability, it is not infallible. Imagine that after processing an acknowledged item, the result of the process is also added to the queue. In some web crawling implementations, first a URL is retrieved from a queue and acknowledged, then an HTML page is fetched from that URL, and finally the links on that page are inserted in the queue. Two problems can occur if the application or thread crashes during this process. If items, in this case URLs, are acknowledged and thus eliminated as soon as they are retrieved, they may be eliminated before enqueuing all of the links on the page. In this case, the remaining links will be lost. If, on the other hand, items are acknowledged only after enqueuing all the links, some links will be duplicated. This conflict is solved with queue transaction semantics. If the process or thread crashes a rollback is performed.

Notes

  1. This persistent queue with acknowledgement assumes that the objects in the queue all have different identities, id(obji) != id(objj) for all i,j. Making a copy of the object works for mutable objects. Immutable objects must be wrapped.
  2. The object classes in the queue must inherit from the Persistent class, including object members.

Prerequisites

  1. Python 2.x (x>=6)
  2. ZODB3

Code

The code is available at github and includes a series of unit tests.

See Also

  1. Esoteric Queue Scheduling Disciplines
  2. Using Queues in Web Crawling and Analysis Infrastructure
  3. Persisting Native Python Queues

Resources

  1. AMQP Acknowledgement
  2. HornetQ Asynchronous Send Acknowledgements
  3. HornetQ Transactions
  4. ZODB In Real Life
  5. Storing Persistent Objects with Persistent Objects as attributes of the Parent PO

Photo taken by Paul Downey

Persisting Native Python Queues

Native Python queues do not allow you to stop and resume an application without loosing queue items. Adding persistence of objects to a derived Python Queue class partially addresses this issue. We use the DyBASE embedded object oriented database to persist queues items in files. If needed, you can instantiate multiple queues pointing to different files. Since our PersistentQueue class is derived from the Python Queue, it works in multithreading environments. Transactional support such as acknowledging successfully processed queue items is not currently a feature of this class.

In Using Queues in Web Crawling and Analysis Infrastructure we noted the relevancy of queues to connect heterogeneous technologies. Queues are also used in the context of a single technology to follow the typical producer/consumer pattern. For example, the Python programming language offers FIFO and priority queues, as does .NET. However, neither of these native queues persists. The Microsoft Windows Azure platform incorporates persistant queues but has other limitations, and also may be overkill for your solution.

There are several ways to persist a queue. If the items that you want to persist have a fixed buffer length then Berkeley DB’s queues or STXXL’s queues work well. You can’t use database managers like GDBM if you need a FIFO queue since you need to traverse the elements in order and the hash table does not assure this order. STXXL, and DyBASE use a B+Tree data structure. You may be tempted to use a database engine like SQLite which can be useful in many scenarios, but an SQL engine adds complexity that is not required for FIFO queues.

Prerequisites

  1. DyBASE: http://www.garret.ru/dybase.html

Code

The code is also available at github.

#!/usr/bin/python

from Queue import Queue
import dybase
import sys

MAX_INT = sys.maxint
MIN_INT = -MAX_INT - 1

#DEBUG = True
DEBUG = False

class Root(dybase.Persistent):
	def __init__(self):
		self.start = 0
		self.stop = 0

class SizeOfPersistentQueueExceeded(Exception):
	pass

class incomplete_persistent_deque:
	def __init__(self, filename):
		self._init_db(filename)

	def _init_db(self, filename):
		self.db = dybase.Storage()
		if self.db.open(filename):
			self.root = self.db.getRootObject()
			if self.root == None:
				self.root = Root()
				self.root.elements = self.db.createIntIndex() # createLongIndex can be used on 64 bits systems but it is strange to pass 2**32 elements in the queue
				self.root.pending_elements = self.db.createIntIndex()

				self.db.setRootObject(self.root)
				self.db.commit()
			else:
				if DEBUG:
					print "self.root already exists"

		if DEBUG:
			print "self.root.start =", self.root.start
			print "self.root.stop = ", self.root.stop

	def __len__(self):
		if self.root.stop >= self.root.start:
			return self.root.stop - self.root.start
		else:
			return (MAX_INT - self.root.start + 1) + (self.root.stop - MIN_INT)

	def append(self, item):
		# add element to index
		self.root.elements.insert(self.root.stop, item)
		self.root.stop += 1
		if self.root.stop > MAX_INT:
			# check also if stop touches start
			self.root.stop = MIN_INT

		if self.root.start == self.root.stop:
			raise SizeOfPersistentQueueExceeded

		# persist
		self.root.store()
		self.db.commit()

	def popleft(self):
		# don't check if empty, Queue class take charge of that
		# remove element from index
		item = self.root.elements.get(self.root.start)
		self.root.elements.remove(self.root.start)
		self.root.start += 1
		if self.root.start > MAX_INT:
			# check also if start touches stop
			self.root.start = MIN_INT 

		if self.root.start == self.root.stop: # if queue is empty resync start & stop to 0. It is for beautifier purposes can be removed.
			self.root.start = 0
			self.root.stop = 0

		# persist
		self.root.store()
		self.db.commit()

		return item

class PersistentQueue(Queue):
	def __init__(self, filename, maxsize = 0):
		self.filename = filename
		Queue.__init__(self, maxsize)

	def _init(self, maxsize):
		# original: self.queue = deque()

		# incomplete_persistent_deque:
		# - incomplete implementation but enough for Queue:
		# - implemented methods:
		# -- __len__
		# -- append
		# -- popleft
		#

		self.queue = incomplete_persistent_deque(self.filename)

	def connect(self): # to handle failovers
		pass

	def ack(self):
		pass

	#def ack(self, item):

class ElementTest:
	def __init__(self, value):
		self.value = value

	def __repr__(self):
		return self.value

	def __str__(self):
		return self.value

def test1():
	q = PersistentQueue("myqueue.dbs")
	if not q.empty(): # get pending items
		while not q.empty():
			e = q.get()
			print e

	for s in ['one', 'two', 'three']:
		q.put(ElementTest(s))

def main(): # run this script twice to see the persisted elements
	test1()

if __name__ == '__main__':
	main()

See Also

  1. Esoteric Queue Scheduling Disciplines
  2. Using Queues in Web Crawling and Analysis Infrastructure
  3. Adding Acknowledgement Semantics to a Persistent Queue

Resources

  1. [queue persistent site:stackoverflow.com] Google query
  2. bsddb3 Python interface for Berkeley DB
  3. bsddb3 examples
  4. STXXL queue class template

Automated Discovery of Blog Feeds and Twitter, Facebook, LinkedIn Accounts Connected to Business Website

Searching for Sales Leads

The best definition of “marketing” I have read is by Dave Kellog in the What the CEO Really Thinks of Marketing (And 5 Things You Can Do About It) presentation. He says that marketing exists to make sales easier. For example, the process of searching for sales opportunities can be optimized if we pay attention to what our prospectives and current customers are sharing on different social media. Good corporate blogs include insightful information about the company’s aims. The first step in this direction is to discover what web resources a specific company has available. The discovery process is easier for companies than for individuals. Individuals uses a variety of aliases and alternative identities on the web. while companies with good communication strategies provide links to all of their web resources on their primary sites.

Discovery

We offer a script which retrieves web resources connected to any company’s URL. With this tool you will no longer waste time manually searching for this useful information. Companies and people usually have a number of associated sites: blogs; LinkedIn accounts; Twitter accounts; Facebook pages; and videos and photos on specialized sites such as YouTube, Vimeo, Flickr, or Picassa. A recursive level of page crawling is needed to retrieve the location of associated resources. Large companies such as IBM or Dell have multiple accounts associated with different areas. IBM has different Twitter accounts for their research divisions and for the important corporate news.

Usage

fwc.py <input.yaml> <output.yaml>

Look at data-science-organizations.yaml for an example.

Prerequisites

  1. Python 2.7 (or greater 2.x series)
  2. lxml.html
  3. parse_domain.py
  4. PyYAML

Script

This code is available at github.

fwc.py

#!/usr/bin/python2.7

import argparse
import sys
from focused_web_crawler import FocusedWebCrawler
import logging
import code
import yaml
from constraint import Constraint

def main():
   logger = logging.getLogger('data_big_bang.focused_web_crawler')
   ap = argparse.ArgumentParser(description='Discover web resources associated with a site.')
   ap.add_argument('input', metavar='input.yaml', type=str, nargs=1, help ='YAML file indicating the sites to crawl.')
   ap.add_argument('output', metavar='output.yaml', type=str, nargs=1, help ='YAML file with the web resources discovered.')

   args = ap.parse_args()

   input = yaml.load(open(args.input[0], "rt"))

   fwc = FocusedWebCrawler()

   for e in input:
      e.update({'constraint': Constraint()})
      fwc.queue.put(e)

   fwc.start()
   fwc.join()

   with open(args.output[0], "wt") as s:
      yaml.dump(fwc.collection, s, default_flow_style = False)

if __name__ == '__main__':
   main()

focused-web-crawler.py

from threading import Thread, Lock
from worker import Worker
from Queue import Queue
import logging

class FocusedWebCrawler(Thread):
   NWORKERS = 10
   def __init__(self, nworkers = NWORKERS):
      Thread.__init__(self)
      self.nworkers = nworkers
      #self.queue = DualQueue()
      self.queue = Queue()
      self.visited_urls = set()
      self.mutex = Lock()
      self.workers = []
      self.logger = logging.getLogger('data_big_bang.focused_web_crawler')
      sh = logging.StreamHandler()
      formatter = logging.Formatter('%(asctime)s - %(name)s - %(levelname)s - %(message)s')
      sh.setFormatter(formatter)
      self.logger.addHandler(sh)
      self.logger.setLevel(logging.INFO)
      self.collection = {}
      self.collection_mutex = Lock()

   def run(self):
      self.logger.info('Focused Web Crawler launched')
      self.logger.info('Starting workers')
      for i in xrange(self.nworkers):
         worker = Worker(self.queue, self.visited_urls, self.mutex, self.collection, self.collection_mutex)
         self.workers.append(worker)
         worker.start()

      self.queue.join() # Wait until all items are consumed

      for i in xrange(self.nworkers): # send a 'None signal' to finish workers
         self.queue.put(None)

      self.queue.join() # Wait until all workers are notified

#     for worker in self.workers:
#        worker.join()

      self.logger.info('Finished workers')
      self.logger.info('Focused Web Crawler finished')

worker.py

from threading import Thread
from fetcher import fetch
from evaluator import get_all_links, get_all_feeds
from collector import collect
from urllib2 import HTTPError
import logging

class Worker(Thread):
   def __init__(self, queue, visited_urls, mutex, collection, collection_mutex):
      Thread.__init__(self)
      self.queue = queue
      self.visited_urls = visited_urls
      self.mutex = mutex
      self.collection = collection
      self.collection_mutex = collection_mutex
      self.logger = logging.getLogger('data_big_bang.focused_web_crawler')

   def run(self):
      item = self.queue.get()

      while item != None:
         try:
            url = item['url']
            key = item['key']
            constraint = item['constraint']
            data = fetch(url)

            if data == None:
               self.logger.info('Not fetched: %s because type != text/html', url)
            else:
               links = get_all_links(data, base = url)
               feeds = get_all_feeds(data, base = url)
               interesting = collect(links)

               if interesting:
                  self.collection_mutex.acquire()
                  if key not in self.collection:
                     self.collection[key] = {'feeds':{}}

                  if feeds:
                     for feed in feeds:
                        self.collection[key]['feeds'][feed['href']] = feed['type']

                  for service, accounts in interesting.items():
                     if service not in self.collection[key]:
                        self.collection[key][service]  = {}

                     for a,u in accounts.items():
                        self.collection[key][service][a] = {'url': u, 'depth':constraint.depth}
                  self.collection_mutex.release()

               for l in links:
                  new_constraint = constraint.inherit(url, l)
                  if new_constraint == None:
                     continue

                  self.mutex.acquire()
                  if l not in self.visited_urls:
                     self.queue.put({'url':l, 'key':key, 'constraint': new_constraint})
                     self.visited_urls.add(l)
                  self.mutex.release()

         except HTTPError:
            self.logger.info('HTTPError exception on url: %s', url)

         self.queue.task_done()

         item = self.queue.get()

      self.queue.task_done() # task_done on None

fetcher.py

import urllib2
import logging

def fetch(uri):
   fetch.logger.info('Fetching: %s', uri)
   #logger = logging.getLogger('data_big_bang.focused_web_crawler')
   print uri

   h = urllib2.urlopen(uri)
   if h.headers.type == 'text/html':
      data = h.read()
   else:
      data = None

   return data

fetch.logger = logging.getLogger('data_big_bang.focused_web_crawler')

evaluator.py

import lxml.html
import urlparse

def get_all_links(page, base = ''):
   doc = lxml.html.fromstring(page)
   links = map(lambda x: urlparse.urljoin(base, x.attrib['href']), filter(lambda x: 'href' in x.attrib, doc.xpath('//a')))

   return links

def get_all_feeds(page, base = ''):
   doc = lxml.html.fromstring(page)

   feeds = map(lambda x: {'href':urlparse.urljoin(base, x.attrib['href']),'type':x.attrib['type']}, filter(lambda x: 'type' in x.attrib and x.attrib['type'] in ['application/atom+xml', 'application/rss+xml'], doc.xpath('//link')))

   return feeds

constraint.py

import urlparse
from parse_domain import parse_domain

class Constraint:
   DEPTH = 1
   def __init__(self):
      self.depth = 0

   def inherit(self, base_url, url):
      base_up = urlparse.urlparse(base_url)
      up = urlparse.urlparse(url)

      base_domain = parse_domain(base_url, 2)
      domain = parse_domain(url, 2)

      if base_domain != domain:
         return None

      if self.depth >= Constraint.DEPTH: # only crawl two levels
         return None
      else:
         new_constraint = Constraint()
         new_constraint.depth = self.depth + 1

         return new_constraint

collector.py

import urlparse
import re

twitter = re.compile('^http://twitter.com/(#!/)?(?P[a-zA-Z0-9_]{1,15})$')

def collect(urls):
   collection = {'twitter':{}}
   for url in urls :
      up = urlparse.urlparse(url)
      hostname = up.hostname

      if hostname == None:
         continue

      if hostname == 'www.facebook.com':
         pass
      elif hostname == 'twitter.com':
         m = twitter.match(url)

         if m:
            gs = m.groupdict()
            if 'account' in gs:
               if gs['account'] != 'share': # this is not an account, although http://twitter.com/#!/share says that this account is suspended.
                  collection['twitter'][gs['account']] = url
      elif hostname == 'www.linkedin.com':
         pass
      elif hostname == 'plus.google.com':
         pass
      elif hostname == 'www.slideshare.net':
         pass
      elif hostname == 'www.youtube.com':
         pass
      elif hostname == 'www.flickr.com':
         pass
      elif hostname[-9:] == '.xing.com':
         pass
      else:
         continue

   return collection

Further Work

This process can be integrated with a variety of CRM and business intelligence processes like Salesforce, Microsoft Dynamics, and SAP. These applications provide APIs to retrieve company URLs which you can crawl with our script.

The discovery process is just the first step in studying your prospective customers and generating leads. Once you have stored the sources of company information it is possible to apply machine learning tools to search for more opportunities.

See Also

  1. Enriching a List of URLs with Google Page Rank
  2. Integrating Google Analytics into your Company Loop with a Microsoft Excel Add-on

Resources

  1. Sales process
  2. Sales process engineering
  3. Microsoft Dynamics API
  4. Salesforce API
  5. SAP API
  6. SugarCRM Developer Zone

Distributed Scraping With Multiple Tor Circuits

Multiple Circuit Tor Solution

When you rapidly fetch different web pages from a single IP address you risk getting stuck in the middle of the scraping. Some sites completely ban scrapers, while others follow a rate limit policy. For example, If you automate Google searches, Google will require you to solve captchas. Google is confused by many people using the same IP, and by search junkies. It used to be costly to get enough IPs to build a good scraping infrastructure. Now there are alternatives: cheap rotating proxies and Tor. Other options include specialized crawling and scraping services like 80legs, or even running Tor on AWS EC2 instances. The advantage of running Tor is its widespread network coverage. Tor is also free of charge. Unfortunately Tor does not allow you to control the bandwidth and latency.

All navigation performed when you start a session on Tor will be associated with the same exit point and its IP addresses. To renew these IP addresses you must restart Tor, or send a newnym signal, or as in our case study you can run multiples Tor instances at the same time If you assign different ports for each one. Many SOCKS proxies will then be ready for use. It is possible for more than one instance to share the same circuit, but that is beyond the scope of this article.

IMDB: A Case Study

If you like movies, Internet Movie Database is omnipresent in your daily life. IMDB users have always been able to share their movies and lists. Recently, however, the site turned previously shared public movie ratings private by default. Useful movie ratings disappeared from Internet with this change, and most of those that were manually set back to public are not indexed by search engines. All links that previously pointed to user ratings are now broken since the URLs have changed. How can you find all the public ratings available on IMDB?
If you use IMDB’s scraping policy it will take years, since the site contains tens of million of user pages. Distributed scraping is the best way to solve this issue and quickly discover which users are sharing their ratings. Our method just retrieves the HTTP response code to find out whether the user is sharing his rating.

Our code sample has three elements:

  1. Multiple Tor instances listening to different ports. The result is many SOCKS proxies available for use with different Tor circuits.
  2. A Python script that launches multiple workers in different threads. Each worker uses a different SOCK port.
  3. MongoDB to persist the state of the scraping if the process fails or if you want to stop the process and continue later.

Shell Script and Source Code

Prerequisites

  1. Tor
  2. MongoDB
  3. PyMongo
  4. SocksiPy
  5. Python

Multiple Tor Launcher

You must run the following script before running the Python script. To adjust the number of Tor instances just change the interval in the loop.

#!/bin/bash

base_socks_port=9050
base_control_port=8118

# Create data directory if it doesn't exist
if [ ! -d "data" ]; then
	mkdir "data"
fi

#for i in {0..10}
for i in {0..80}

do
	j=$((i+1))
	socks_port=$((base_socks_port+i))
	control_port=$((base_control_port+i))
	if [ ! -d "data/tor$i" ]; then
		echo "Creating directory data/tor$i"
		mkdir "data/tor$i"
	fi
	# Take into account that authentication for the control port is disabled. Must be used in secure and controlled environments

	echo "Running: tor --RunAsDaemon 1 --CookieAuthentication 0 --HashedControlPassword \"\" --ControlPort $control_port --PidFile tor$i.pid --SocksPort $socks_port --DataDirectory data/tor$i"

	tor --RunAsDaemon 1 --CookieAuthentication 0 --HashedControlPassword "" --ControlPort $control_port --PidFile tor$i.pid --SocksPort $socks_port --DataDirectory data/tor$i
done

Python Script

The script below stores its results on MongoDB on the “imdb” db under the “imdb.ratings” collection. To handle the number of simultaneous workers you can change the “Discovery.NWorkers” variable. Note that the the number of workers must be equal to or less than the number of Tor instances.

#!/usr/bin/python

import httplib
import socks
import urllib2
from Queue import Queue
from threading import Thread, Condition, Lock
from threading import active_count as threading_active_count

import time
from pymongo import Connection
import pymongo

url_format = 'http://www.imdb.com/user/ur{0}/ratings'

http_codes_counter = {}

MONGODB_HOSTNAME = '192.168.0.118'

"""
https://gist.github.com/869791

SocksiPy + urllib handler

version: 0.2
author: e

This module provides a Handler which you can use with urllib2 to allow it to tunnel your connection through a socks.sockssocket socket, without monkey patching the original socket...
"""

class SocksiPyConnection(httplib.HTTPConnection):
    def __init__(self, proxytype, proxyaddr, proxyport = None, rdns = True, username = None, password = None, *args, **kwargs):
        self.proxyargs = (proxytype, proxyaddr, proxyport, rdns, username, password)
        httplib.HTTPConnection.__init__(self, *args, **kwargs)

    def connect(self):
        self.sock = socks.socksocket()
        self.sock.setproxy(*self.proxyargs)
        if isinstance(self.timeout, float):
            self.sock.settimeout(self.timeout)
        self.sock.connect((self.host, self.port))

class SocksiPyHandler(urllib2.HTTPHandler):
    def __init__(self, *args, **kwargs):
        self.args = args
        self.kw = kwargs
        urllib2.HTTPHandler.__init__(self)

    def http_open(self, req):
        def build(host, port=None, strict=None, timeout=0):
            conn = SocksiPyConnection(*self.args, host=host, port=port, strict=strict, timeout=timeout, **self.kw)
            return conn
        return self.do_open(build, req)

class Monitor(Thread):
	def __init__(self, queue, discovery):
		Thread.__init__(self)
		self.queue = queue
		self.discovery = discovery
		self.finish_signal = False

	def finish(self):
		self.finish_signal = True

	def run(self):
		while not self.finish_signal:
			time.sleep(5)
			print "Elements in Queue:", self.queue.qsize(), "Active Threads:", threading_active_count(), "Exceptions Counter:", self.discovery.exception_counter

class Worker(Thread):
	def __init__(self, queue, discovery, socks_proxy_port):
		Thread.__init__(self)
		self.queue = queue
		self.discovery = discovery
		self.socks_proxy_port = socks_proxy_port
		self.opener = urllib2.build_opener(SocksiPyHandler(socks.PROXY_TYPE_SOCKS4, 'localhost', self.socks_proxy_port))
		self.conn = Connection(MONGODB_HOSTNAME, 27017)
		self.db = self.conn.scraping
		self.coll = self.db.imdb.ratings

	def get_url(self, url):
		try:
			#h = urllib2.urlopen(url)
			h = self.opener.open(url)

			return h.getcode()

		except urllib2.URLError, e:
			return e.code

	def run(self):
		while True:
			try:
				index = self.queue.get()

				if index == None:
					self.queue.put(None) # Notify the next worker
					break

				url = url_format.format(index)

				code = self.get_url(url)

				self.coll.update({'index':index}, {'$set': {'last_response':code}})

				self.discovery.lock.acquire()
				self.discovery.records_to_process -= 1
				if self.discovery.records_to_process == 0:
					self.discovery.lock.notify()
				self.discovery.lock.release()

			except (socks.Socks4Error, httplib.BadStatusLine), e:
				# TypeError: 'Socks4Error' object is not callable
				print e
				self.discovery.exception_counter_lock.acquire()
				self.discovery.exception_counter += 1
				self.discovery.exception_counter_lock.release()
				pass # leave this element for the next cycle

			time.sleep(1.5)

class Croupier(Thread):
	Base = 0
	Top = 25000000
	#Top = 1000
	def __init__(self, queue, discovery):
		Thread.__init__(self)
		self.conn = Connection(MONGODB_HOSTNAME, 27017)
		self.db = self.conn.scraping
		self.coll = self.db.imdb.ratings
		self.finish_signal = False
		self.queue = queue
		self.discovery = discovery
		self.discovery.records_to_process = 0

	def run(self):
		# Look if imdb collection is empty. Only if its empty we create all the items
		c = self.coll.count()
		if c == 0:
			print "Inserting items"
			self.coll.ensure_index([('index', pymongo.ASCENDING), ('last_response', pymongo.ASCENDING)])
			for i in xrange(Croupier.Base, Croupier.Top):
				self.coll.insert({'index':i, 'url': url_format.format(i), 'last_response': 0})

		else:
			print "Using #", c, " persisted items"

		while True:
			#items = self.coll.find({'last_response': {'$ne': 200}})
			items = self.coll.find({'$and': [{'last_response': {'$ne': 200}}, {'last_response' : {'$ne': 404}}]}, timeout = False)

			self.discovery.records_to_process = items.count()

			if self.discovery.records_to_process == 0:
				break

			for item in items:
				self.queue.put(item['index'])

			# Wait until the last item is updated on the db
			self.discovery.lock.acquire()
			while self.discovery.records_to_process != 0:
				self.discovery.lock.wait()
			self.discovery.lock.release()

#			time.sleep(5)

		# Send a 'signal' to workers to finish
		self.queue.put(None)

	def finish(self):
		self.finish_signal = True

class Discovery:
	NWorkers = 71
	SocksProxyBasePort = 9050
	Contention = 10000

	def __init__(self):
		self.queue = Queue(Discovery.Contention)
		self.workers = []
		self.lock = Condition()
		self.exception_counter_lock = Lock()
		self.records_to_process = 0
		self.exception_counter = 0

	def start(self):
		croupier = Croupier(self.queue, self)
		croupier.start()

		for i in range(Discovery.NWorkers):
			worker = Worker(self.queue, self, Discovery.SocksProxyBasePort + i)
			self.workers.append(worker)

		for w in self.workers:
			w.start()

		monitor = Monitor(self.queue, self)
		monitor.start()

		for w in self.workers:
			w.join()

		croupier.join()

		print "Queue finished with:", self.queue.qsize(), "elements"

		monitor.finish()

def main():
	discovery = Discovery()
	discovery.start()

if __name__ == '__main__':
	main()

#
# MISC NOTES
#
# - How many IMDB ratings pages are currently indexed by Google? query: inurl:www.imdb.com/user/*/ratings
# - [pymongo] cursor id '239432858681488351' not valid at server Options: http://groups.google.com/group/mongodb-user/browse_thread/thread/4ed6e3d77fb1c2cf?pli=1
#     That error generally means that the cursor timed out on the server -
#     this could be the case if you are performing a long running operation
#     while iterating over the cursor. The best bet is probably to turn off
#     the timeout by passing "timeout=False" in your call to find:
#

This script will gather users with public ratings using the following MongoDB query: db.imdb.ratings.find({‘last_response’: 200})
Try exporting the movies ratings. This the easiest part because it is now a comma separated value file and you don’t need an XPath query.

Additional observations

  1. We are not just using MongoDB because it is fancy, but also because it is very practical for quickly prototyping and persisting data along the way. The well-known “global lock” limitation on MongoDB (and many other databases) does not significantly affect its ability to efficiently store data.
  2. We use SocksiPy to allow us to use different proxies at the same time.
  3. If you are serious about using Tor to build a distributed infrastructure you might consider running Tor proxies on AWS EC2 instances as needed.
  4. Do not forget to run Tor instances in a secure environment since the control port is open to everyone without authentication.
  5. Our solution is easily scalable.
  6. If you get many 503 return codes, try balancing the quantity of proxies and delaying each worker’s activity.

See Also

  1. Running Your Own Anonymous Rotating Proxies
  2. Web Scraping Ajax and Javascript Sites
  3. Luminati Distributed Web Crawling

Resources

  1. An Improved Algorithm for Tor Circuit Scheduling
  2. How Much Anonymity does Network Latency Leak?
  3. StackOverflow Tor Questions
  4. New IMDB Ratings Breaks Everything
  5. Distributed Harvesting and Scraping

The Python POPO’s Way to Integrate PayPal Instant Payment Notification

Pompeo Massani: The Money Counter

Python PayPal IPN

PayPal is the fastest, but not the best, way to incorporate payments on your web site and reach a worldwide audience. If you are searching for a Plain Old Python Object (POPO) way to integrate with the Python programming language, you are on your own. The Instant Payment Notification (IPN) page only incorporates ASP, .NET, ColdFusion, Java, Perl and PHP samples. A web search will bring up a ton of Python code. Most of this code will be for frameworks such as Django. The rest will not be specifically for connecting Python with IPN: there will be a lot of extra code you do not need. Here is a translation of the PHP sample code into Python.

Code

also available on GitHub.

#!/usr/bin/python

# PHP to Python translation from: https://cms.paypal.com/cms_content/US/en_US/files/developer/IPN_PHP_41.txt

import urllib
import cgi
import cgitb
import socket, ssl, pprint
import pickle
import sys
import json

cgitb.enable(logdir='../logs/')

form = cgi.FieldStorage()

req = 'cmd=_notify-validate'
for k in form.keys():
	v = form[k]
	value = urllib.quote(v.value.decode('string_escape')) # http://stackoverflow.com/questions/13454/python-version-of-phps-stripslashes
	req = req + '&{0}={1}'.format(k, value)

header = 'POST /cgi-bin/webscr HTTP/1.0\r\n'
header += 'Content-Type: application/x-www-form-urlencoded\r\n'
header += 'Content-Length: ' + str(len(req)) + '\r\n\r\n'

s = socket.socket(socket.AF_INET, socket.SOCK_STREAM)
ssl_sock = ssl.wrap_socket(s)
ssl_sock.connect(('www.sandbox.paypal.com', 443)) # Use this for sandbox testing
# ssl_sock.connect(('www.paypal.com', 443)) # Use this for production

ssl_sock.write(header + req)

data = ssl_sock.read()
VERIFIED = False
while len(data) > 0:
	if 'VERIFIED' in data:
		VERIFIED = True
		break
	elif 'INVALID' in data:
		VERIFIED = False
		break

	data = ssl_sock.read()

ssl_sock.close()

if not VERIFIED:
	print "Content-type: text/plain"
	print
	print "Not Verified"
	sys.exit(1)

fields = {	'item_name': None,
		'item_number': None,
		'payment_status': None,
		'mc_gross': None,
		'mc_currency': None,
		'txn_id': None,
		'receiver_email': None,
		'payer_email': None,
		'custom': None,
	}

for k in fields.keys():
	if k in form:
		fields[k] = form[k].value

item_name = fields['item_name']
item_number = fields['item_number']
payment_status = fields['payment_status']
payment_amount = fields['mc_gross']
payment_currency = fields['mc_currency']
txn_id = fields['txn_id']
receiver_email = fields['receiver_email']
payer_email = fields['payer_email']

# check the payment_status is Completed
# check that txn_id has not been previously processed
#  check that receiver_email is your Primary PayPal email
# check that payment_amount/payment_currency are correct
# process payment

print "Content-type: text/plain"
print
print "Verified"

Resources

  1. PayPal Developer Network
  2. GitHub projects related to PayPal written in Python

Language Identification for Text Mining and NLP

The Tower of Babel and ships in a large marine landscape.

Introduction

Language Identification is a key task in the text mining process. Successful analysis of extracted text with natural language processing or machine learning training requires a good language identification algorithm. If it fails to recognize the language, this error will nullify subsequent  processes. NLP algorithms must be adjusted for different corpuses and according to the grammar of different languages. Certain NLP software is best suited to certain languages. For example NLTK is the most popular natural language processing package for English under Python, but as FreeLing is best for Spanish. The efficiency of language processing depends on many factors.

A very high level model for text analysis includes the following tasks:

Text Extraction
Text can be extracted by: scraping a web site, importing it in a specific format, getting it from a database, or accessing it via an API.

Text Identification
Text identification is a process which can separate interesting text from other content or format that adds noise to the analysis. For example a blog can include advertising, menus, and other information besides the main content.

NLP
NLP is a set of algorithms to aid in the processing of different languages. See links to NLP software packages and articles here.

Machine Learning
Machine learning is a necessary step for tasks such as collaborative filtering, sentiment analysis and clustering.

Software Alternatives

There is a lot of language identification software available on the web. NLTK uses Crúbadán, while Gate includes TextCat. At Data Big Bang, we like to use Google Language API because it is very accurate even for just one word. It also includes an accuracy measure in the response.

Sadly, Google has deprecated the Google Language API Family and we have added them to our “Google NoAPI” list. They can be used until they are shut down.

Example Including an API Key

Google highly recommends including an API key with the API request. You can get one at http://code.google.com/apis/loader/signup.html or with the new Google API Console https://code.google.com/apis/console/. Use it as follows:

language-identification.py

#!/usr/bin/python

# Language Detection using Google Language API: http://code.google.com/apis/language/translate/v2/getting_started.html
# It can handle unicode texts. You need to add your exception/errors catching.
import sys
import urllib
import urlparse
import simplejson

ENDPOINT = "https://www.googleapis.com/language/translate/v2/detect"
KEY = "" # Insert your key here. Get it from: https://code.google.com/apis/console/

def detect_language(text):
   utf8_encoded_text = text.encode('utf-8')
   query_field = urllib.urlencode({'key':KEY, 'q':utf8_encoded_text})
   parsed_url = urlparse.urlparse(ENDPOINT)
   url = urlparse.urlunparse((parsed_url[0], parsed_url[1], parsed_url[2], parsed_url[3], query_field, parsed_url[5]))

   data = simplejson.loads(urllib.urlopen(url).read())
   response = data['data']['detections'][0][0]

   return response # it answers: {'isReliable': , 'confidence': , 'language': }

if __name__ == '__main__':
   terminal_encoding = sys.stdin.encoding
   text = raw_input("Text? ")
   unicode_text = text.decode(terminal_encoding)
   response = detect_language(unicode_text)

   print response

Google Language API for language identification is very easy to use and was very permissive in terms of usage limitation but now the rate limit status can be found in the console.

Benchmarking 

Different language identification algorithms can be easily benchmarked against the Google’s. Testing with single words and small sentences is a good indicator, especially if the algorithms will be used for services like twitter where the sentences are very short.

Resources

  1. Google Scholar search on language identification
  2. Google language detection
  3. Lingua Identify for Perl
  4. A language detection library for Java
  5. Language identification addition for NLTK
  6. Sentiment analysis and language processing tools
  7. Balie language identification
  8. Gate
  9. NLTK
  10. FreeLing
  11. TextCat and TextCat under Gate
  12. LingPipe

Automated Browserless OAuth Authentication for Twitter

Introduction

My first impression after having my first encounter with the OAuth protocol was: bureaucracy meets the web. It’s understandable that in order to authorize third party applications users must approve  access to their own information, but if I want to access my personal information under my own application why do I need to complete all this “paperwork”?

Also, user experience suffers when you have to jump to the browser and return to your application as part of the workflow. Mobile and desktop apps need more alternatives to work around that. Twitter offers the xAuth API for desktop and mobile applications but you have to send a request with “plenty of details” and may have to wait a long time to get it.

This article describes how to use the OAuth 3-legged protocol with a headless browser like HtmlUnit to get tokens from twitter without user intervention.

The example uses HtmlUnit and Jython. If you want to use HtmlUnit under .NET I recommend looking at Using HtmlUnit on .NET for Headless Browser Automation (using IKVM). WP7 developers may also want to look at the .NET article to see if it could be applied to Silverlight.

Once you obtain the token you can keep it to use in future calls. Be aware that tokens may expire based on conditions such as time. Ethically, the automated application should ask users to either allow or deny applications access to twitter.

Prerequisites

  1. JRE or JDK
  2. Download and Install the latest Jython version. Run the .jar and install it in your preferred directory (e.g: /opt/jython).
  3. Download and decompress setuptools-0.6c11.tar.gz
  4. Go to the setuptools directory. Install the package under Jython with: sudo /opt/jython/bin/jython setup.py install
  5. Download and decompress python-twitter-0.8.1.tar.gz
  6. Look at the required dependencies for python-twitter and install them with Jython:
    1. http://cheeseshop.python.org/pypi/simplejson
    2. http://code.google.com/p/httplib2/
    3. http://github.com/simplegeo/python-oauth2
    4. You’ll need to change the file oauth2/__init__.py for Jython 2.5 compatibility:
from urlparse import parse_qs, parse_qsl

to:

try:

from urlparse import parse_qsl, parse_qs

except ImportError:

from cgi import parse_qsl, parse_qs


  1. Under the python-twitter-0.8.1 directory download the HtmlUnit compiled binaries from http://sourceforge.net/projects/htmlunit/files/ (we are using HtmlUnit 2.8 for this example).
  2. Go to the python-twitter-0.8.1 directory and Install the python-twitter package under Jython:
    1. sudo /opt/jython/bin/jython setup.py install
  3. Create a twitter application for testing and get its key and secret.

Example

get_access_token.py

Changes

  1. Replace consumer_key and consumer_secret with your application key/secret.
  2. Add the following imports and get_pincode function:
import com.gargoylesoftware.htmlunit.WebClient as WebClient
import com.gargoylesoftware.htmlunit.BrowserVersion as BrowserVersion

def get_pincode(url, username, password):
  webclient = WebClient(BrowserVersion.FIREFOX_3_6)
  page = webclient.getPage(url)

  twitter_username_or_email = page.getByXPath("//input[@id='username_or_email']")[0]
  twitter_password = page.getByXPath("//input[@id='password']")[0]
  allow_button = page.getByXPath("//input[@id='allow']")[0]

  twitter_username_or_email.setValueAttribute(username)
  twitter_password.setValueAttribute(password)

  page = allow_button.click()

  code = page.getByXPath("//kbd/code")[0]

  return code.getTextContent()
  1. Replace:
pincode = raw_input('Pincode? ')

with:

  twitter_username = None # replace it with your twitter username
  twitter_password = None # replace it with your twitter password
  print "Geting pincode"
  pincode = get_pincode('%s?oauth_token=%s' % (AUTHORIZATION_URL, request_token['oauth_token']),  twitter_username, twitter_password)
  print "pincode =", pincode


run.sh

#!/bin/sh
/opt/jython/jython -J-classpath "htmlunit-2.8/lib/*" get_access_token.py

Complete source code

#!/usr/bin/python2.4
#
# Copyright 2007 The Python-Twitter Developers
#
# Licensed under the Apache License, Version 2.0 (the "License");
# you may not use this file except in compliance with the License.
# You may obtain a copy of the License at
#
#     http://www.apache.org/licenses/LICENSE-2.0
#
# Unless required by applicable law or agreed to in writing, software
# distributed under the License is distributed on an "AS IS" BASIS,
# WITHOUT WARRANTIES OR CONDITIONS OF ANY KIND, either express or implied.
# See the License for the specific language governing permissions and
# limitations under the License.

import os
import sys

# parse_qsl moved to urlparse module in v2.6
try:
  from urlparse import parse_qsl
except:
  from cgi import parse_qsl

import oauth2 as oauth

# HTMLUnit related code
import com.gargoylesoftware.htmlunit.WebClient as WebClient
import com.gargoylesoftware.htmlunit.BrowserVersion as BrowserVersion

def get_pincode(url, username, password):
  webclient = WebClient(BrowserVersion.FIREFOX_3_6)
  page = webclient.getPage(url)

  twitter_username_or_email = page.getByXPath("//input[@id='username_or_email']")[0]
  twitter_password = page.getByXPath("//input[@id='password']")[0]
  allow_button = page.getByXPath("//input[@id='allow']")[0]

  twitter_username_or_email.setValueAttribute(username)
  #password.text = password
  #password.setText(password) # HtmlPasswordInput
  twitter_password.setValueAttribute(password)

  page = allow_button.click()

  code = page.getByXPath("//kbd/code")[0]

  return code.getTextContent()

REQUEST_TOKEN_URL = 'https://api.twitter.com/oauth/request_token'
ACCESS_TOKEN_URL  = 'https://api.twitter.com/oauth/access_token'
AUTHORIZATION_URL = 'https://api.twitter.com/oauth/authorize'
SIGNIN_URL        = 'https://api.twitter.com/oauth/authenticate'

consumer_key    = None
consumer_secret = None
twitter_username = None
twitter_password = None

if consumer_key is None or consumer_secret is None:
  print 'You need to edit this script and provide values for the'
  print 'consumer_key and also consumer_secret.'
  print ''
  print 'The values you need come from Twitter - you need to register'
  print 'as a developer your "application".  This is needed only until'
  print 'Twitter finishes the idea they have of a way to allow open-source'
  print 'based libraries to have a token that can be used to generate a'
  print 'one-time use key that will allow the library to make the request'
  print 'on your behalf.'
  print ''
  sys.exit(1)

signature_method_hmac_sha1 = oauth.SignatureMethod_HMAC_SHA1()
oauth_consumer             = oauth.Consumer(key=consumer_key, secret=consumer_secret)
oauth_client               = oauth.Client(oauth_consumer)

print 'Requesting temp token from Twitter'

resp, content = oauth_client.request(REQUEST_TOKEN_URL, 'GET')

if resp['status'] != '200':
  print 'Invalid respond from Twitter requesting temp token: %s' % resp['status']
else:
  request_token = dict(parse_qsl(content))

  print ''
  print 'Please visit this Twitter page and retrieve the pincode to be used'
  print 'in the next step to obtaining an Authentication Token:'
  print ''
  print '%s?oauth_token=%s' % (AUTHORIZATION_URL, request_token['oauth_token'])
  print ''

  print "Geting pincode"
  pincode = get_pincode('%s?oauth_token=%s' % (AUTHORIZATION_URL, request_token['oauth_token']), twitter_username, twitter_password)
  print "pincode =", pincode

#  pincode = raw_input('Pincode? ')

  token = oauth.Token(request_token['oauth_token'], request_token['oauth_token_secret'])
  token.set_verifier(pincode)

  print ''
  print 'Generating and signing request for an access token'
  print ''

  oauth_client  = oauth.Client(oauth_consumer, token)
  resp, content = oauth_client.request(ACCESS_TOKEN_URL, method='POST', body='oauth_verifier=%s' % pincode)
  access_token  = dict(parse_qsl(content))

  if resp['status'] != '200':
    print 'The request for a Token did not succeed: %s' % resp['status']
    print access_token
  else:
    print 'Your Twitter Access Token key: %s' % access_token['oauth_token']
    print '          Access Token secret: %s' % access_token['oauth_token_secret']
    print ''

Conclusion

We have seen how to getOAuth tokens with a headless browser. This approach can be applied to other services such as Facebook and LinkedIn. A partial list of other services you can play with is available at: http://wiki.oauth.net/w/page/12238551/ServiceProviders

Look at our previous article Web Scraping Ajax and Javascript Sites for more information about setting up and usage HtmlUnit and Jython.

Sadly the prerequisites part requires an important extra effort to have it working quickly but once you have setup all the development environment it’s plain sailing.

Resources

  1. OAuth articles from Eran Hammer-Lahav
  2. OAuth 2.0 for Android Applications
  3. OAuth Will Murder Your Children
  4. Do Facebook Oauth 2.0 Access Tokens Expire?
  5. OAuth2 for iPhone and iPad applications
  6. Movistar BlueVia’s official API for SMS

Photo taken by mariachily

Google Search NoAPI

History

Way back in 2001 I wanted to be able to query Google automatically. Since Google did not provide an official API,  I developed a small simple Google Search “NoAPI” scraper  and published it as Googolplex. Google launched a SOAP based API but on December 20, 2006 they stopped accepting signups for the API1 and suspended it on August 31, 20092.  This shows that creating a service or product based on web APIs is a very risky business without an SLA contract. Google soon launched another API called Google Ajax Web Search API3 under a different license. This second API was suspended on November 1, 20104. You may wonder if Google is a bipolar creature. You can see the latest post at Fall Housekeeping.

Google has undergone a lot of changes since 2001 and Googolplex and other  libraries like xgoogle are now part of Internet history. A similar new library  is available at Mario Vilas Google Search Python blog post as Quickpost: Using Google Search from your Python code.

It’s not clear why Google vacilates over what could be an additional source of revenue, but it is clear that we should expect Google to provide an official and easy to use API. There are ways Google could restrict abuse of their APIs by third parties. It’s very common to offer a free alternative for low volume searches and charge for more intensive uses like Yahoo BOSS does.

In this article we’ll examine one way of crawling information in AJAX/Javascript based sites.

Crawling Google As A Browser

If you go to Google and look at the html source code you’ll be astonished to see pure Javascript obfuscated code. Even after searching the source is not clearer.

So, here is our code to get Google’s results using htmlunit/jython,we don’t have any affiliation with them,jwejust like it!). Look at our Web Scraping Ajax and Javascript Sites for more information.

google.py

import com.gargoylesoftware.htmlunit.WebClient as WebClient
import com.gargoylesoftware.htmlunit.BrowserVersion as BrowserVersion

def query(q):
   webclient = WebClient(BrowserVersion.FIREFOX_3_6)
   url = "http://www.google.com"
   page = webclient.getPage(url)

   query_input = page.getByXPath("//input[@name='q']")[0]
   query_input.text = q
   search_button = page.getByXPath("//input[@name='btnG']")[0]
   page = search_button.click()
   results = page.getByXPath("//ol[@id='rso']/li//span/h3[@class='r']")

   c = 0
   for result in results:
      title = result.asText()
      href = result.getByXPath("./a")[0].getAttributes().getNamedItem("href").nodeValue
      print title, href
      c += 1

   print c,"Results"

if __name__ == '__main__':
   query("google web search api")

run.sh

/opt/jython/jython -J-classpath "htmlunit-2.8/lib/*" google.py

Alternatives

The following search engines provide official APIs for search:

Homework

  1. Write a clean function/class to do Google queries and handle exceptions.
  2. Modify the function to handle nested and paged results
  3. Modify the function again, this time to include descriptions.

Final Notes

The approach taken by Mario Vilas is more API like, our approach here is a defensive measure against NoAPIs. This is another good example where HtmlUnit does its job.

BTW the noapi.com domain is available5

See Also

  1. Extraction of Main Text Content Using the Google Reader NoAPI
  2. The Data Portability Fact Sheet

References

  1. Beyond the SOAP Search API
  2. A well earned retirement for the SOAP Search API
  3. Google AJAX Search API beta Version 1.0 Available
  4. Fall Housekeeping
  5. The noapi.com domain is available at the time of writing of this article. Register it now! (Disclaimer: affiliate link).

Additional Resources

  1. Google Search API?
  2. Google Deprecates Their SOAP Search API
  3. Google Search API Dropped
  4. Is this API going to be closed down?
  5. Yahoo BOSS Switching To Paid Model In Early 2011
  6. Thoughts on Yahoo! BOSS Monetization Announcement
  7. Google to Start Charging for Prediction API
  8. Update on Whitelisting (Twitter API policies discussion)
  9. From “Businesses” To “Tools”: The Twitter API ToS Changes

Web Scraping Ajax and Javascript Sites

Introduction

Most crawling frameworks used for scraping cannot be used for Javascript or Ajax. Their scope is limited to those sites that show their main content without using scripting. One would also be tempted to connect a specific crawler to a Javascript engine but it’s not easy to do. You need a fully functional browser with good DOM support because the browser behavior is too complex for a simple connection between a crawler and a Javascript engine to work. There is a list of resources at the end of this article to explore the alternatives in more depth.

There are several ways to scrape a site that contains Javascript:

  1. Embed a web browser within an application and simulate a normal user.
  2. Remotely connect to a web browser and automate it from a scripting language.
  3. Use special purpose add-ons to automate the browser
  4. Use a framework/library to simulate a complete browser.

Each one of these alternatives has its pros and cons. For  example using a complete browser consumes a lot of resources, especially if we need to scrape websites with a lot of pages.

In this post we’ll give a simple example of how to scrape a web site that uses Javascript. We will use the htmlunit library to simulate a browser. Since htmlunit runs on a JVM we will use Jython, an [excellent] programming language,which is a Python implementation in the JVM. The resulting code is very clear and focuses on solving the problem instead of on the aspects of programming languages.

Setting up the environment

Prerequisites

  1. JRE or JDK.
  2. Download the latest version of Jython from http://www.jython.org/downloads.html.
  3. Run the .jar file and install it in your preferred directory (e.g: /opt/jython).
  4. Download the htmlunit compiled binaries from: http://sourceforge.net/projects/htmlunit/files/.
  5. Unzip the htmlunit to your preferred directory.

Crawling example

We will scrape the Gartner Magic Quadrant pages at: http://www.gartner.com/it/products/mq/mq_ms.jsp . If you look at the list of documents, the links are Javascript code instead of hyperlinks with http urls. This is may be to reduce crawling, or just to open a popup window. It’s a very convenient page to illustrate the solution.

gartner.py

import com.gargoylesoftware.htmlunit.WebClient as WebClient
import com.gargoylesoftware.htmlunit.BrowserVersion as BrowserVersion

def main():
   webclient = WebClient(BrowserVersion.FIREFOX_3_6) # creating a new webclient object.
   url = "http://www.gartner.com/it/products/mq/mq_ms.jsp"
   page = webclient.getPage(url) # getting the url
   articles = page.getByXPath("//table[@id='mqtable']//tr/td/a") # getting all the hyperlinks

   for article in articles:
      print "Clicking on:", article
      subpage = article.click() # click on the article link
      title = subpage.getByXPath("//div[@class='title']") # get title
      summary = subpage.getByXPath("//div[@class='summary']") # get summary
      if len(title) > 0 and len(summary) > 0:
         print "Title:", title[0].asText()
         print "Summary:", summary[0].asText()
#     break

if __name__ == '__main__':
   main()

run.sh

/opt/jython/jython -J-classpath "htmlunit-2.8/lib/*" gartner.py

Final notes

This article is just a starting point to move ahead of simple crawlers and point the way for further research. As this is a simple page, it is a good choice for a clear example of how Javascript scraping works.You must do your homework to learn to crawl more web pages or add multithreading for better performance. In a demanding crawling scenario a lot of things must be taken into account, but this is a subject for future articles.

If you want to be polite don’t forget to read the robots.txt file before crawling…

If you like this article, you might also be interested in

  1. Distributed Scraping With Multiple Tor Circuits
  2. Precise Scraping with Google Chrome
  3. Running Your Own Anonymous Rotating Proxies
  4. Automated Browserless OAuth Authentication for Twitter

Resources

  1. HtmlUnit
  2. ghost.py is a webkit web client written in python
  3. Crowbar web scraping environment
  4. Google Chrome remote debugging shell from Python
  5. Selenium web application testing systemWatirSahiWindmill Testing Framework
  6. Internet Explorer automation
  7. jSSh Javascript Shell Server for Mozilla
  8. http://trac.webkit.org/wiki/QtWebKit
  9. Embedding Gecko
  10. Opera Dragonfly
  11. PyAuto: Python Interface to Chromum’s automation framework
  12. Related questions on Stack Overflow
  13. Scrapy
  14. EnvJS: Simulated browser environment written in Javascript
  15. Setting up Headless XServer and CutyCapt on Ubuntu
  16. CutyCapt: Capture WebKit’s rendering of a web page.
  17. Google webmaste blog: A spider’s view of Web 2.0
  18. OpenQA
  19. Python Webkit DOM Bindings
  20. Berkelium Browser
  21. uBrowser
  22. Using HtmlUnit on .NET for Headless Browser Automation (using IKVM)
  23. Zombie.js
  24. PhantomJS
  25. PyPhantomJS
  26. CasperJS
  27. Web Inspector Remote
  28. Offscreen/Headless Mozilla Firefox (via @brutuscat)
  29. Web Scraping with Google Spreadsheets and XPath
  30. Web Scraping with YQL and Yahoo Pipes

Photo taken by xiffy